How to Install Superfoil Insulation
Compared to many other types of insulation, multifoil (and SuperFoil in particular) is widely considered to be a simple job to fit. Lightweight and requiring no protective equipment, it is an ideal choice for a range of applications covering roofs, walls and floors. Still, for first-time installers, the job may look daunting but with the proper know-how and some pre-planning you’ll find it is far easier than it may first appear.
Quick Tips for Fitting Superfoil
There are a few potential pitfalls that you can stumble upon when installing insulation, so first things first we’ll go over a few tips that should keep you on the right path. Starting with the proper way to cut SuperFoil.
In most cases, cutting should be fairly minimal. After all, this foil is designed to be installed as a continuous layer meaning you can cut it to size after it has been lain out to the desired length. To ensure this is done quickly and accurately, you should always make sure to secure the appropriate tools for the jobs. In this casce, a sharp pair of decorating sheers, a utility knife, or (in the case of thicker material) an electric rotary cutter.
Similarly, when stapling the foil always make sure to use the correct size staples (table below). An ordinary heavy-duty tacker should be more than enough for the job – just make sure to place your fasteners at roughly 200-300mm intervals.
Other than your staples, you should also take care to source the correct timber battens so as to leave an appropriately sized air gap that will allow the insulation’s maximum performance. Non self-tapping screws are the brand recommended choice here, as self-tapping can run the risk of interfering with the inner layers of the foil.
Pitched Roof
| Min. Batten Size (External/Internal) | Staple Size | |
| SFBB | 25mm / 38mm | 10mm |
| SF19BB | 38mm / 50mm | 14mm |
| SF40BB | 50mm / 63mm | 30mm |
Flat Roof
| Min. Batten Size (External/Internal) | Staple Size | |
| SFBB | 38mm | 20mm |
| SF19BB | 50mm | 30mm |
| SF40BB | 63mm | 40mm |
Finally, as well as your foil make sure to order some suitable tape to go alongside it. This will be needed to seal up any joints, tears or edges for a superior, air-tight finish. Again, this is a simple touch to get the best out of your insulation and remove any draughts that may otherwise hamper their performance.
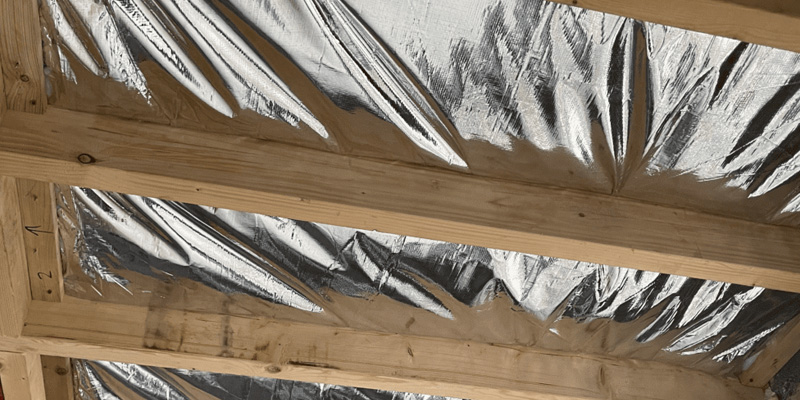
How to Install Superfoil on a Pitched Roof
Under Rafters
- Apply a length SuperFoil directly to the rafters – This can be done either vertically or horizontally, though it is recommended if you do choose horizontal, that you start at the bottom and work your up. Apply tension to the foil and staple it into place, through into the rafters at 150mm intervals. Once the length is finished, simply cut it to size.
- Continue applying layers whilst overlapping – Follow the above across the interior of your roof, ensuring that all layers are overlapped by at least 50mm and that they are affixed onto the rafters where the joint crosses.
- Cut and seal SuperFOIL around the rafters at the eaves – When you reach your eaves, trim the foil and seal it to either the wall plate or cavity wall insulation.
- Seal joints – Finish by sealing all joints, tears and cuts with SuperFOIL 100mm tape, taking care to check for any penetrations to ensure the whole surface is airtight.
- Fix your counter battens – Using correctly sized battens, fix them atop your insulation horizontal at a maximum of 600mm centres to allow for adequate airspace. The internal finish can then be attached as per the manufacturer's guidelines.
Over Rafters
- Apply a length of SuperFoil on top of the rafters – Starting from the bottom, roll out your foil and staple it into place as per steps 1 & 2 above stapling at approximately 50 – 100mm intervals.
- Trim internal insulation at side edges and fold over breather membrane – With all layers of insulation installed, fold back the external breather membrane and trim your insulation back to the rafter timbers. Fold the membrane back over to encapsulate the edge of the insulation and then staple it into place.
- Check overlaps and attach battens – Next make sure that all overlaps have been correctly sealed with suitable tape. If yes, then move on to attaching your battens in line with the roof joists. Finish up by fixing your tile batten in line with the manufacturer's guidelines.
If installing on a non-counter battened roof...
- Apply SuperFoil directly from the roll – Affix your foil to the top of the rafters horizontally as above. Allow the foil to drape into the rafter void to create a roughly 10mm gap between the top of your insulation and the underside of your tile batten. Again, staple at 50 – 100mm intervals with a 50mm overlap of each layer of foil and follow steps 2 and 3 above.
How to Install Superfoil on a Flat Roof
- Apply SuperFoil from roll to internal joist face – Starting from the external wall, staple your roll into place and continue to roll out across the joists, making sure to hold it tort whilst stapling at 50 – 100mm intervals.
- Cut layer to size and continue across the entire roof – Once the first layer is complete, cut to size and then continue with the next layer, ensuring a minimum 50mm overlap. To create the most secure fixing, staple the insulation down onto the joists where the joint crosses.
- Seal & install counter battens – Use SuperFOIL 100mm tape to seal all joints, tears and cuts. Next, fit your counter battens atop your insulation horizontally at a maximum of 60mm centres. Finish by attaching your internal finish per the manufacturer's guidelines.
Have More Questions About Fitting Superfoil?
Whether you're extending your property or simply want to improve the efficiency of your home, you're certain to find the ideal materials at Roofing Megastore. Plus, our award-winning customer service team is on hand to help with any questions you may have. Just give them a call on 01295 565 565 or get in touch via the online chat below to get your project started.