How to Install a Breathable Roof Membrane
What is a Breathable Roof Membrane?
A breathable roof membrane is an air permeable wrap that allows moisture to move out of the roof space, ensuring it stays dry and undamaged. Breathable roof membranes are resistant to water, dust, and snow, creating a secondary layer of protection for roof structures where the exterior cladding is not watertight and moisture resistant.
They help to enhance the thermal ability of the roof structure as well as sheltering the roof space from harsh winds, restricting movement of air through the wall.
Why is a Breathable Roof Membrane Important?
Breathable roof membranes provide 3 key features:
- Water vapour resistance
- Water vapour permeability
- Water tightness
Without a roof membrane, moisture may move through the external cladding and allow condensation to form. This can be problematic when the water begins to drip down through the roof and causes mould growth, structural water damage and even breathing problems.
Where are Breathable Roof Membranes Installed?
Breathable roof membranes are fitted on the cold side of a roof’s insulation, beneath the support of the tiles. They are key in pitched roof construction.
What Will I Need for Installation?
Breathable Membrane – Of course, the main component you need for installation is the membrane itself. Look for a high-quality watertight breather membrane that is suitable for use in roof structures.
The SuperFOIL SFBB Reflective Breathable Membrane is a reliable and cost-effective vapour permeable breather membrane manufactured by industry leading experts, SuperFOIL. It is suitable for both new build and renovation projects, helping to improve the air and watertightness of your building as well as enhancing the thermal performance (U-Value).
Why not also check out the Britmet - Breather Membrane. With exceptional resistance levels, simple installation and minimal maintenance, this high-quality breathable membrane is the perfect fit for a wide range of roofing projects.
Eaves Support Tray/UV Resistant Membrane – Usually a UV resistant is fitted along the eaves. Although this is an effective solution, when exposed at the leaves for a long period of time, it can degrade. In this case, an eaves support tray can be fitted to direct water away from the underlay, draining to the gutter.
The Easy-trim - Eaves Felt Support Tray is easy to install, helping to minimise the need for future maintenance. It prevents the underlay from draping into the guttering, as well as protecting the underlay and fascia from weathering and UV rays.
Clout Nails – Clout nails are used in installation to provide temporary fixing.
Hammer – A hammer is used to fix the clout nails.
Timber Batten – An additional timber batten may be installed if the overlap of the membrane does not coincide with an existing timber batten on the roof structure.
The Graded BS5534 Timber Roof Batten is the perfect fix for virtually any roofing project. These top-quality roof battens are expertly produced from top-grade, slow grown spruce and offer an impressive moisture content of below 22%.
Breather Membrane Installation Step-by-Step
- Begin at the Eaves
Installation begins at the eaves. If you are using UV resistant membrane, ensure the bottom edge of the membrane is extended halfway or at least 150mm into the gutter. When fitting an eave felt support tray along the eaves, make sure that the bottom edge again extends halfway into the gutter.
- Unroll the Membrane
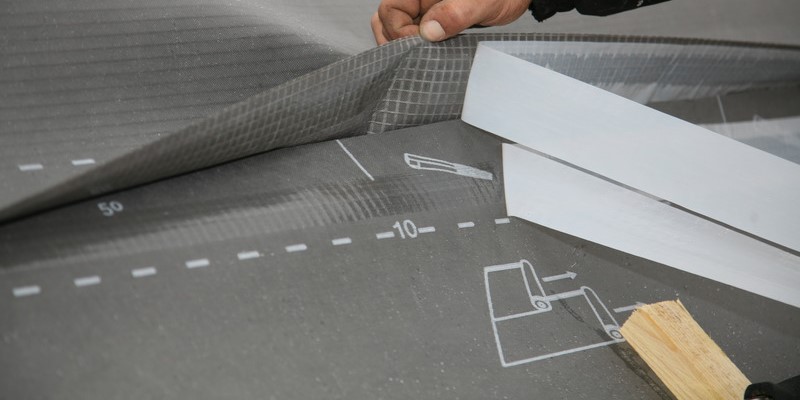
Unroll the breathable membrane and lay it out parallel with the roof eaves. With most brands of membrane, the printed side will be facing outwards. However, always ensure to double-check any installation instructions provided by the manufacturer.
- Draped NOT Taught
Draping the breathable roof membrane instead of laying it taught ensures that the moisture does not run off quickly. This helps to minimise the risk of ingress.
Allow the roof membrane to dip between the rafters as this will form rainwater channels. Create a dip of at least 10-15mm.
- Clout Nails
Next, you can add temporary clout nails to the top of the breathable membrane. Place carefully so that the nails are fixed above the line at which the second membrane length will be overlapped.
- Additional Timber Batten
Usually, manufacturers will include measurements, stating how much overlap is needed between each membrane length. Sometimes, you may find that this overlap doesn’t correspond with an existing timber roof batten. However, this problem can be easily fixed by installing an additional batten across the top of the underlay.
REMEMBER! When fixing additional battens, you must ensure that the underlay drape is still intact to allow the effective drainage of rainwater.
- Ridge Ventilation
If your roof structure requires ridge ventilation, you must ensure that you cut the breathable roof membrane on both sides of the ridge to create completely clear airways for venting.
- Roof Valleys
For roof valleys, the breathable roof membrane should be extended by a minimum of 300mm on each side, from the centre of the valley. To form a secondary water-proof barrier, turn the underlay up by at least 100mm at the abutments.
- Verges
When working with dry fix verges, ensure the roof membrane is laid extending past the gable face. When working with a wet verge, the membrane should lap onto the masonry by a minimum of 50mm.
- Chimneys, Soil Pipes, Windows etc.
When working around penetrations such as chimneys, soil pipes and windows, you need to cut the roof membrane and turn it so that it sits folded against said penetration. If you are working around a round penetration edge, cut the membrane in an Asterix shape. This will form flaps that can fold upwards to fit. If you find that the cut-out flaps are folding back down, you can use tape to secure them.
Completed!
Your breathable roof membrane is now successfully installed. The membrane will create a ventilated, condensation free roof space with additional protection against rainwater, wind, snow and ice.
If you are looking for a high-quality membrane for your next roofing project, take a look at the top-grade, affordable range of breather membranes available on Roofing Megastore now!
If you have any further questions or queries, don’t hesitate to get in touch with our friendly customer service team who will be more than happy to help. You can give them a call on 01295 565565, email [email protected], or just leave a message in our handy live chat.