Mega Guide to Felting a Roof
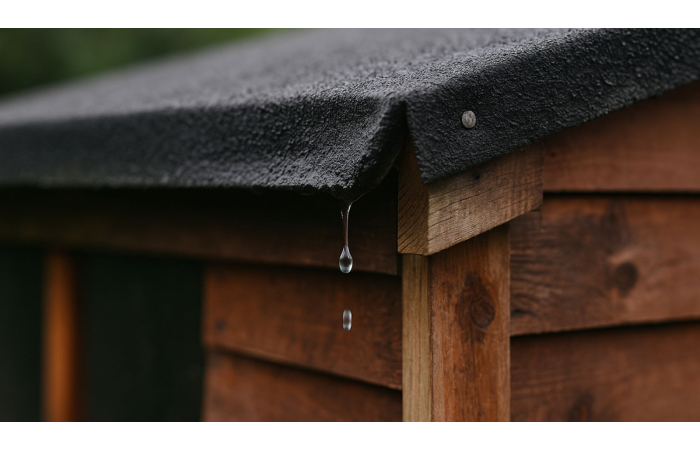
Roof felt is a simple and cost-effective countermeasure against wind-driven rain and serves to keep flat roofs, garages, and sheds watertight. It also prevents the entry of insects and other pests, at a reasonable cost of just £50 per meter squared. What’s more, a felt roof couldn’t be easier to install, even for a homeowner doing a bit of DIY.
Felt has been used as a roofing material for well over one hundred years, and in that time three main installation methods have developed. These include Cold Adhesive, Torch-on and Shed. Beyond this, we’ll also explore re-felting your roof as well as the types of repairs that you might have to perform to keep your felt roof in tip-top condition.
Table of Contents
- What Is Roofing Felt?
- Advantages of Roofing Felt
- Getting Started & What You’ll Need
- How to Felt A Shed Roof?
- How to Felt Flat Roofs & Garages?
- How to Repair a Felt Roof?
- Ordering the Right Roof Felt
What Is Roofing Felt?
Often seen in the form of bitumen felt shingles, felt is a highly common roofing material used to cover and protect structures from damp, snow, wind, rain, pests, and other external dangers. Typically, roof felt is used as an underlay which sits beneath roof tiles or slates on pitched roofs, but it can also be used as the main roof covering for flat roofs, sheds, garages, and other outbuildings.
The most common form of roof felt in use today is manufactured from bitumen, a tar-like substance derived from distilling crude oil mixed with sand and crushed limestone. This is then applied to a fibrous membrane made from hessian, fibreglass, polyester, or paper, before being finished with a layer of sand or fine gravel for aesthetics. Roofing felt is generally packaged in easy-to-handle rolls.
When properly fitted, roofing felt can enjoy a long lifespan, generally between 10-20 years. This can both increase and decrease, depending on how well-treated and maintained your felt roof is over its lifetime. Despite its longevity, felt is one of the most affordable forms of roofing, which is one reason it’s so popular amongst DIYers. However, roof felt can be prone to damage and can decay over time. Many felt roofs will require repairs every now and then, which we’ll talk more about later
Advantages of Roofing Felt
Cost-Effective
Choosing a felt roof for your garden building is perhaps the most inexpensive option available, yet roofing felt still offers solid durability and longevity. This makes felt the perfect option for homeowners undertaking small projects such as 4x6’ garden sheds.
Lightweight
As well as offering value for money, roof felt is also one of the lightest materials on the market. This means felt is a great choice for small or structurally weak structures, such as lightweight timber sheds and outbuildings, that couldn’t handle the weight of other materials.
Simple to Install
Another advantage of its light weight is just how easy it makes roofing felt to handle. Supplied in easy-to-use rolls in handy sizes, felt can be applied to a roof using just a hammer, some nails, or specially made adhesive. Making the job quick and easy, whether you’re a professional or a DIYer.
Easy to Repair
Whilst roofing felt is highly durable, it can be prone to certain forms of damage or wear and tear. Fortunately, it couldn’t be easier to patch up or replace felt when there’s an issue such as a crack or a hole. The same can’t be said for many other materials however, which can require a full, complex replacement.
Versatility
Unlike other roofing materials such as slates or roofing sheets, roofing felt can be cut and shaped to fit nearly any kind of roof. This means that no matter the complexity of your structure’s design, as long as you have the adequate square meterage of felt, you’re well on your way.
Getting Started & What You’ll Need
Before you get started on fitting your felt the first thing you’ll need to do is determine is the area of your flat roof, garage or shed. It is important that this measurement is accurate. Apart from the obvious need to know how much felt to order, these measurements will also tell you both the size and shape your felt needs to be cut to.
How to Calculate the Area of a Roof?
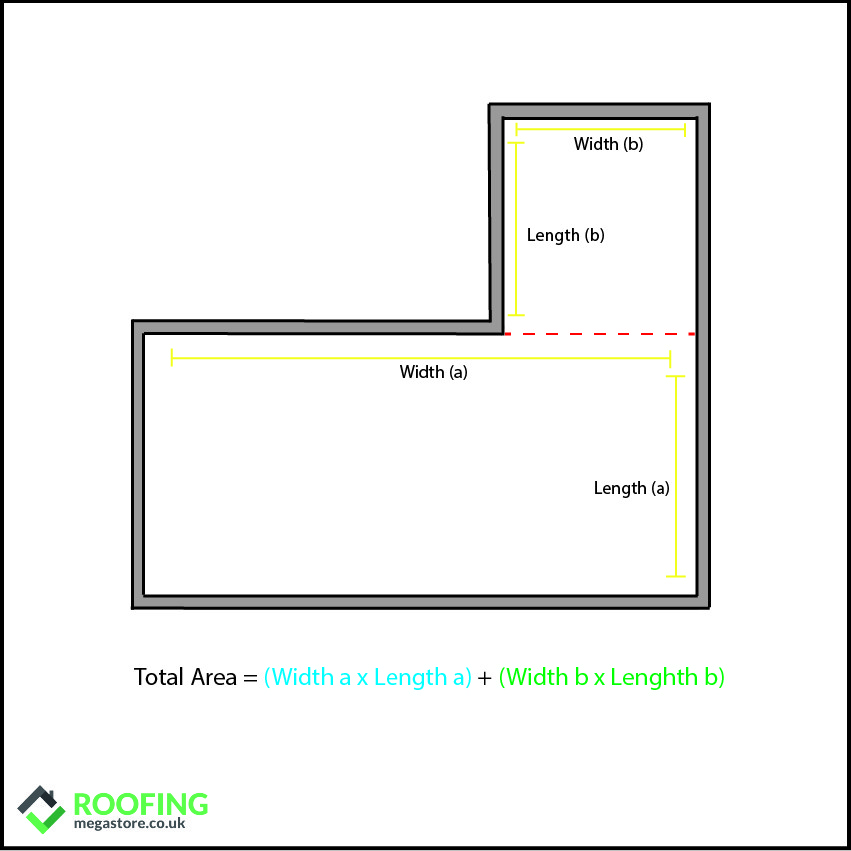
Fortunately, the formula for determining your roof’s area is a simple one. As you might have guessed, all you need to do here is multiply the roofs length by its width. If your flat roof is a four-sided shape, this will be a simple task. If, however, the design is slightly more complex your best bet is to isolate your roof into separate four-sided sections, determine the area of those sections and then add them together.
This is similar in the case of Apex Sheds. Simply measure the roofs length and multiple it by the slope height. This will give you the area of one side, so simply multiple this figure by two for the full area.
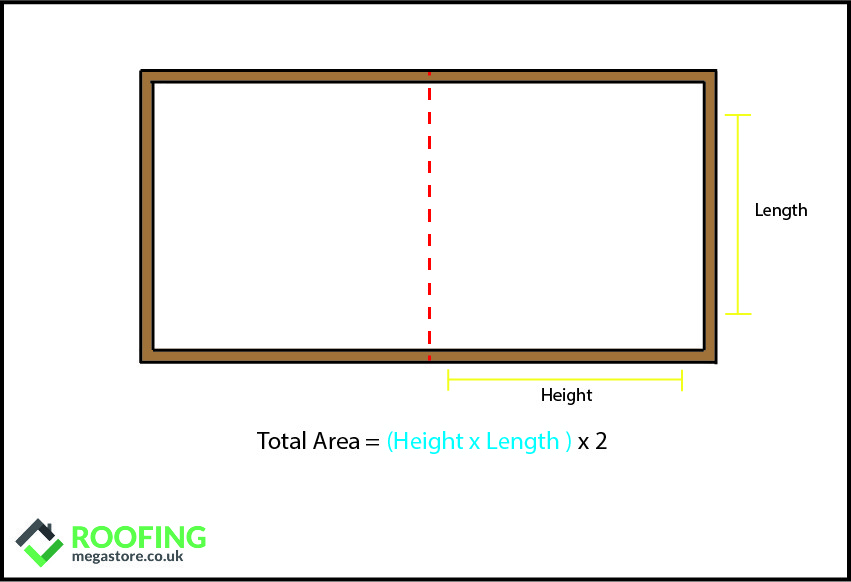
Slope Height: The distance between your ridge/apex and one side of you’re the bottom of your roof.
Next, you’ll need to get your kit in order. The tools required will change depending on which method of installation you are using.
Tools & Materials Needed to Felt a Shed Roof
- Claw Hammer
- Stanley Knife (Hooked Blade)
- 50mm Brush
- Tape Measure
- Flat Pry Bar
- Galvanised Clout Nails
- Felt Adhesive
- Mineral Cap Sheet
- Suitable Roof Felt
Tools & Materials Needed to Lay Torch-On Felt
- Hard-bristled Brush
- Claw Hammer
- Stanley/Utility Knife
- Straight Edge
- Cutting Board
- Tape Measure
- Gas/Propane Torch
- Heavy Duty Gloves and Work Boots
- Vapour Control Sheet/Underlay Felt
- Cap Sheet
- Suitable Roof Felt
Tools & Materials Needed to Felt a Roof with Self-Adhesive
- Claw Hammer
- Tape Measure
- Stanley/Utility Knife
- Straight Edge
- Cutting Board
- Broom
- Brush (for adhesive)
- Heavy Duty Gloves
- Underlay Felt
- Suitable Roofing Felt
- Large Headed Clout Nails
- Cold Applied Adhesive
- Solar Paint (if needed)
Finding the right roofing felt for your project can be a challenging task on its own. However, with a little research, you’re sure to find the right product for you. For example, our range from felt roofing specialists IKO, includes products ideal for both garden shed and larger flat roofs.
Can You Install Felt Over Felt?
If you need to re-felt a roof, you should never just fit a new layer on top. In most cases the reason this job needs doing is because the current felt is old or has been damaged to an extent where simple repairs can not ensure a watertight covering. Therefore, it is important to remove the current layer of felt, not because it will cause issues when laying the new felt but rather to check the condition of your roof deck.
This is an important stage as any tears, rips or holes in the current layer of felt may have allowed water to seep in and damage the roof’s structure. If this is the case, repairing and/or replacing those damaged elements will need to be done before any new felt is laid.
How Much Does It Cost to Re-felt a Roof?
This will vary significantly depending on the size of your roof, how much repair work needs doing and whether or not you are also paying for labour. That being said, the average cost of felt per square meter is roughly £50. This makes the cost of an entire medium sized flat roof (30m²) around £1,500, not including labour costs or any extra needed for tools.
How to Felt A Shed Roof?
Without question, felt is the cheapest shed roof covering, and can be fitted using only basic tools in as little as two hours (on an average shed roof). Even professional grade felt, which can last up to 20 years, is more affordable than any rubber-based alternative. Some brands even produce their felt in a range of colours to suit the style of your home and garden.
When choosing your felt, you should take note of the thickness and weight (commonly between 3.5 – 4.5). If your shed’s structure does not have a lot of support, you should always make sure to choose a thinner roofing felt to put as little strain on the roof deck as possible.
How Much Does It Cost to Felt a Shed Roof?
There are a few factors to consider here, such as the size of the shed and the quality of the shed felt you choose. Depending on this, shed felt could cost anywhere between £50 - £600 including our popular Polyester PRO Shed Felt However, as this job can be completed by DIYers of all skill levels you will not have to worry about any additional labour costs.
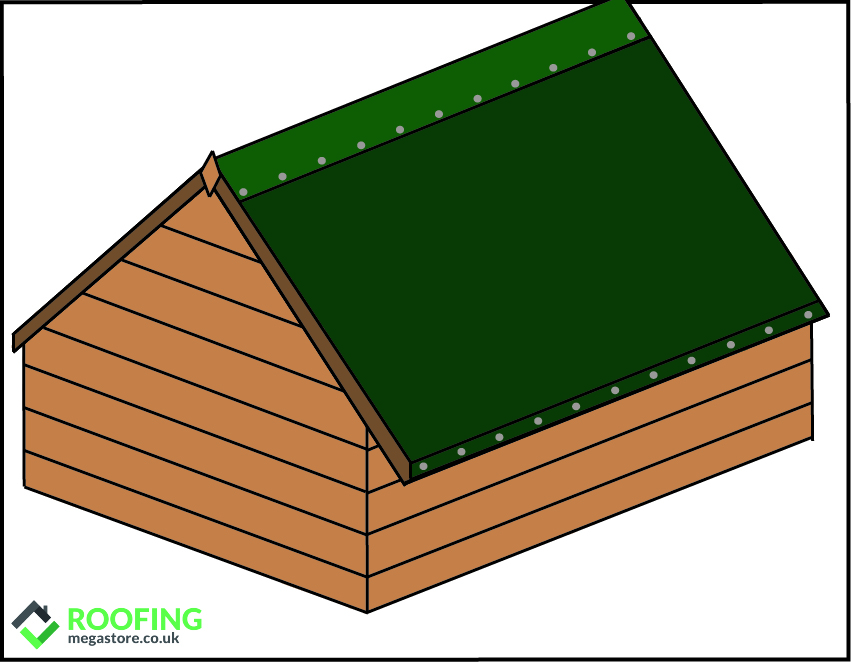
How to Felt an Apex Shed Roof
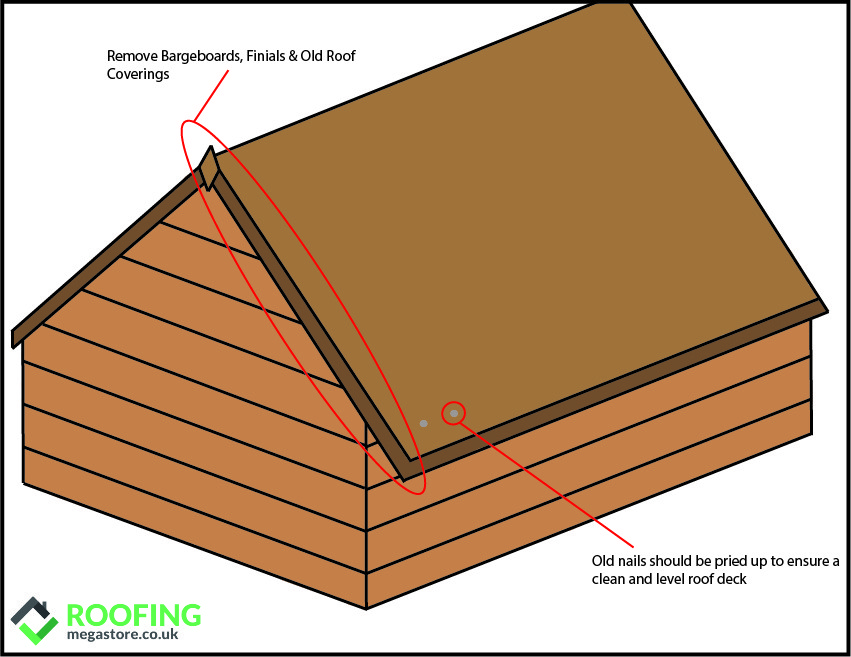
- Remove Bargeboards, Finials & Old Roof Coverings
The first job is to prep your shed for the felt covering. This involves carefully removing any finials, bargeboards and guttering that will get in the way during the installation. This can simple be done by prying away any fixings keeping them in place. If these fixings are in good condition be sure to keep them alongside the elements you have removed so that you can reaffix them after the felt has been installed. Similarly, any current roof covering should be carefully removed and disposed of so that you can check the condition of the roof deck. Make sure this is clean, clear and damage free (both externally and internally) before proceeding.
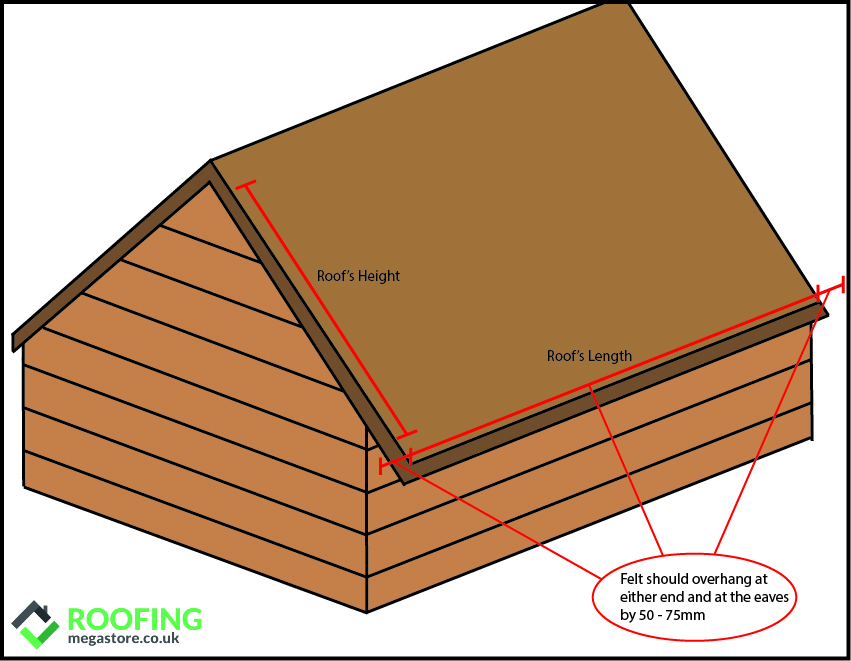
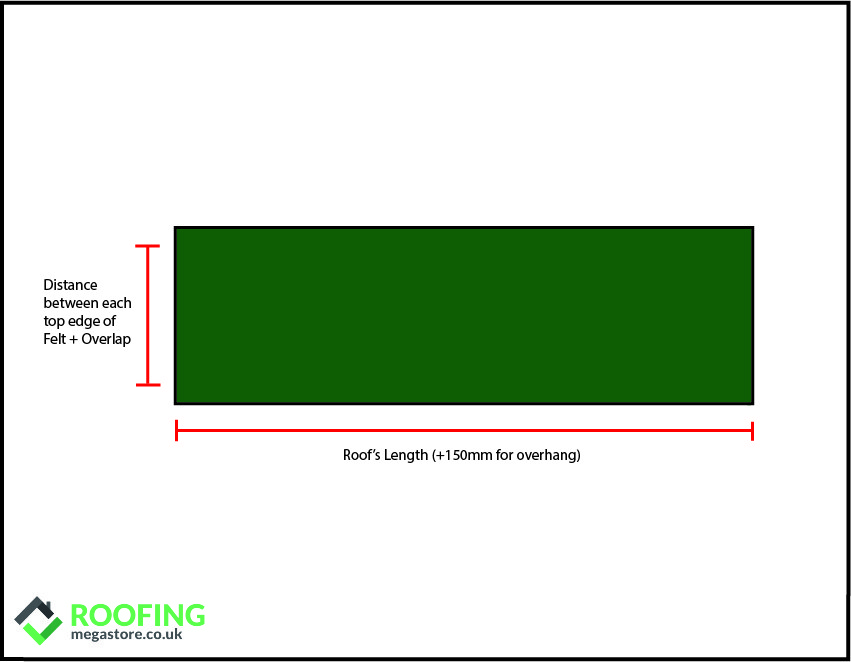
- Measure Your Roof’s Length
Take a measurement of the length of your sheds roof. Add 100-150mm to this figure to account for the felts overhang at the front and back.
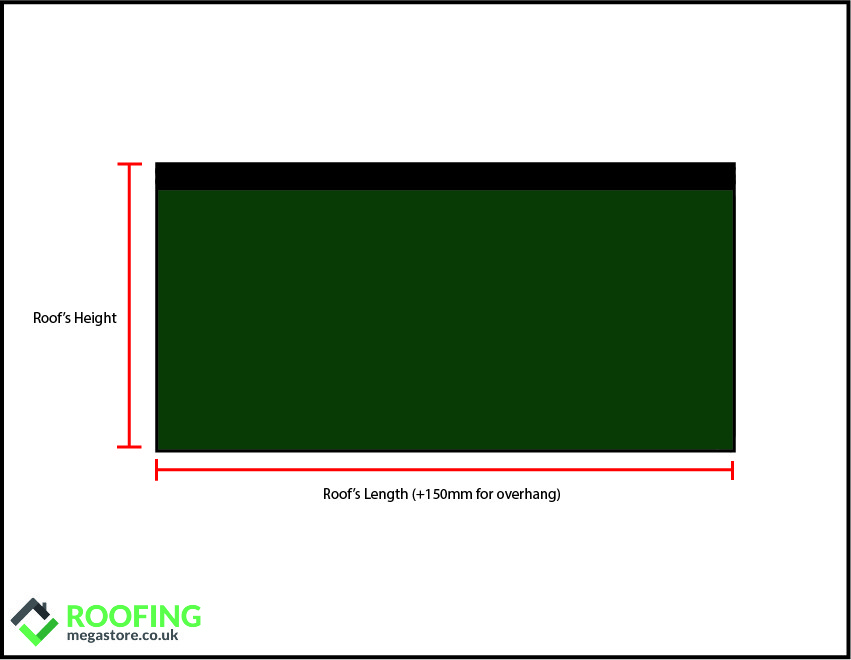
- Cut Your Felt
Roll out your felt across a flat surface and mark the measurement you took earlier. It’s best to first score a line with the back of your blade to give a clear-cutting marker. Using a straight edge or level cut through the felt in accordance with this scored line. You will need to cut two equal lengths of felt for each side of the roof.
- Roll out Your Felt
Roll up the piece of felt you have just cut and move it onto your roof. Position it at the front end, remembering to allow for a 50-75mm overhang. You should also have the end of your felt overhang at the eaves by at least 50mm or as long as it needs to be to cover the whole batten and allow water to drain away without coming into contact with the timber.
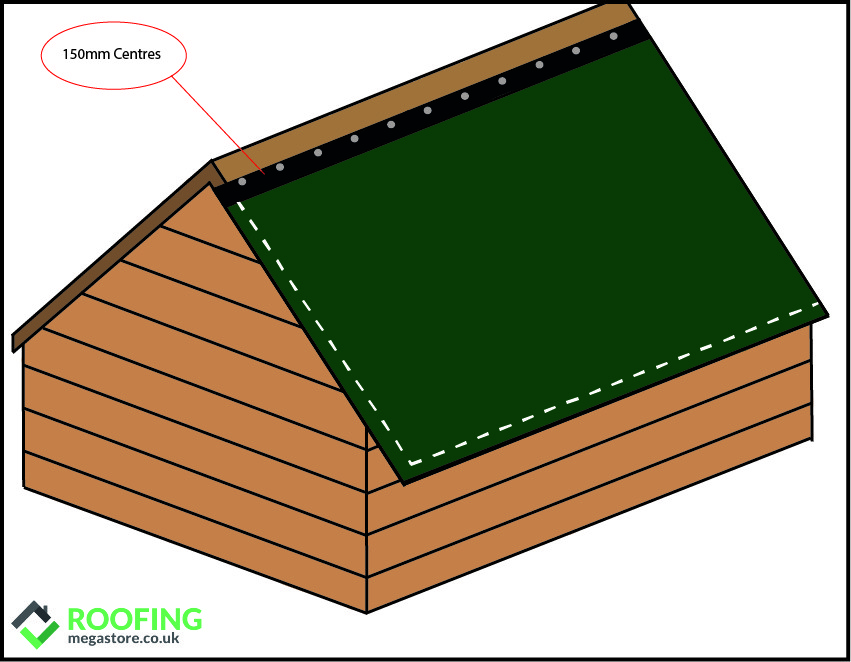
When rolling out the felt on an Apex Shed make sure that the black lap joint (if your felt has one) is near the ridge, leaving a roughly 50mm gap before the apex. This gap will be covered by anther length of felt. If you are working by yourself, you may want to nail in some temporary fixings to hold the felt in place whilst you work.

- Fix Your Felt to the Roof Deck
Ensure that your felt is square and that your overhangs are correct. If so, you can start fixing your felt in place using large headed galvanised clout nails. These nails should be long enough to penetrate the roof deck through the felt, but not so long that they will be visible from the inside. These nails should be fixed at 150mm centres across the top of the felt through the upper half of the black lap joint. This process should be repeated on the parallel side of the roof with the second length of felt.
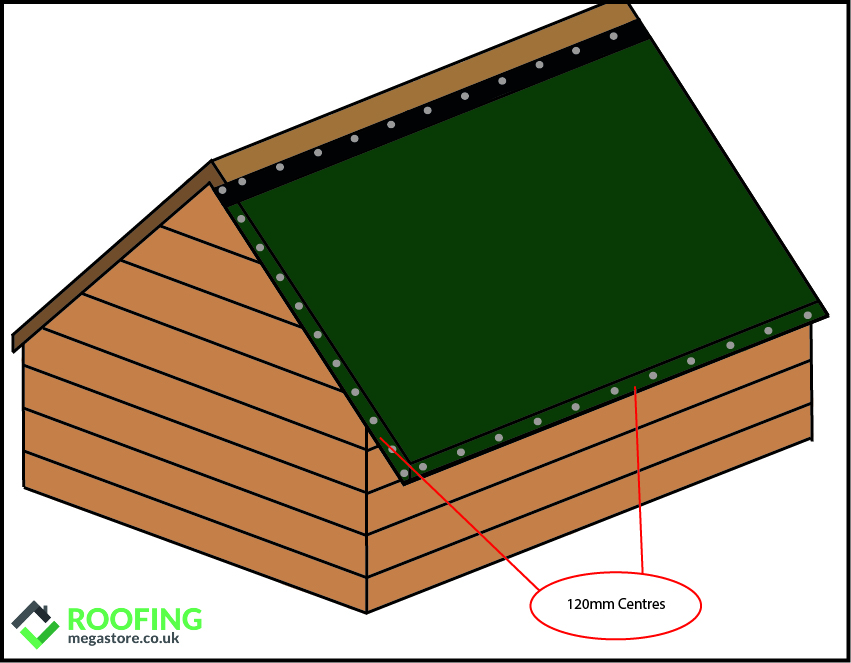
- Fix Your Felt to the Shed’s Corners and Eaves
Gently pull the felt down tort across the eaves and fix using nails at 120mm centres. Once done, repeat this for the overhangs at the front and back. The Felt at the corners of the shed can be fixed by pinching the free hanging felt together and forming a simple ‘pigs ear’ fold. Lay this flat against the batten and fix with a longer clout nail.
- Measure Your Ridge & Cut Your Cap Sheet
Measure from each outer edge of black lap joint to determine the length of your ridge cap and add 10mm to ensure the lap will be completely hidden. If your felt does not have lap joints, ensure your cap is wide enough to overlap both pieces of felt by at least 50mm on either side of your roof. Cut your ridge cap in the same way you cut your original felt piece, also allowing for 50-75mm of overhang at the front and back.
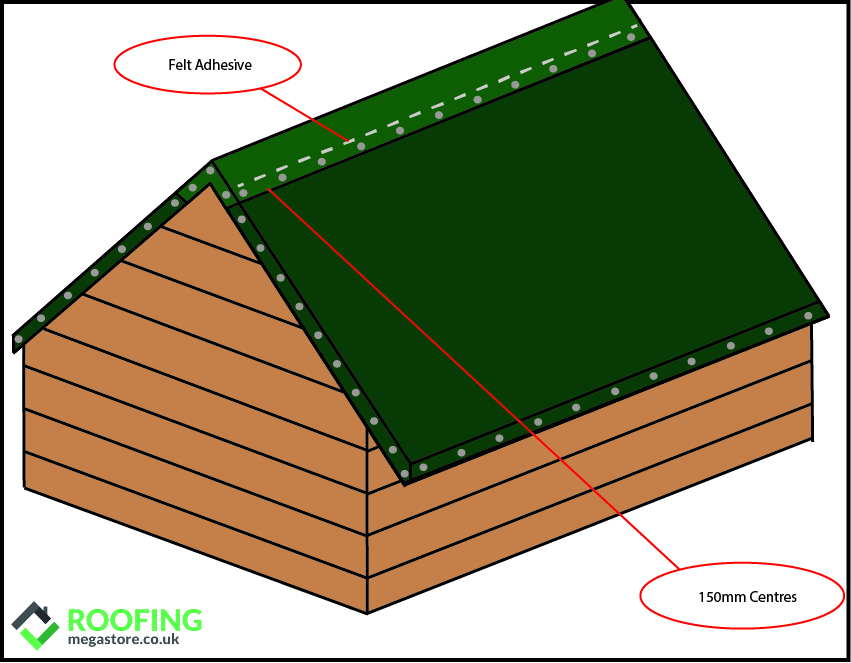
- Fix Your Ridge Cap
Place your ridge cap on the roof to ensure it is the correct size. Once you are happy, temporarily affix it in place on side of the roof so that you can fold it back without losing its position. Fold the felt back and brush on felt adhesive evenly across the black lap joint. Nail the freshly glued side in place at 150mm centres. Remove the temporary nails from the other side and repeat this process. Finally, fold and nail the overhangs at the front and back of the roof.
- Reaffix Bargeboards & Finials
The last step is to reattach all of the elements your originally removed and your new felt shed roof will be complete.
How to Felt a Pent Shed Roof
- Follow the Above Steps 1-4
Fitting a felt roof a Pent Shed is very similar to that of an Apex. Typically, you will still need two pieces of felt to cover the whole roof. As you want these two pieces to overlap in the middle, measure to the centre of your roof and add 50mm. This will be your felts width. As above, score the felt before cutting.
- Fix your Felt
Again, follow the guidance above, fixing your felt at the top at 150mm centres and at the eaves, front and back at 120mm centres. Make sure that the second piece of felt overlaps the first and that both are tort and free of any bumps or creases.
- Reaffix Bargeboards
Once you’re happy the felt is secure re attach your Bargeboards. If you want to test your roof, the best way to do this is by simply spraying it with water from a hose and making sure that it is all draining off properly. If water is running down the side of your shed, it may mean the overlaps need to be longer.
How to Felt Flat Roofs & Garages?
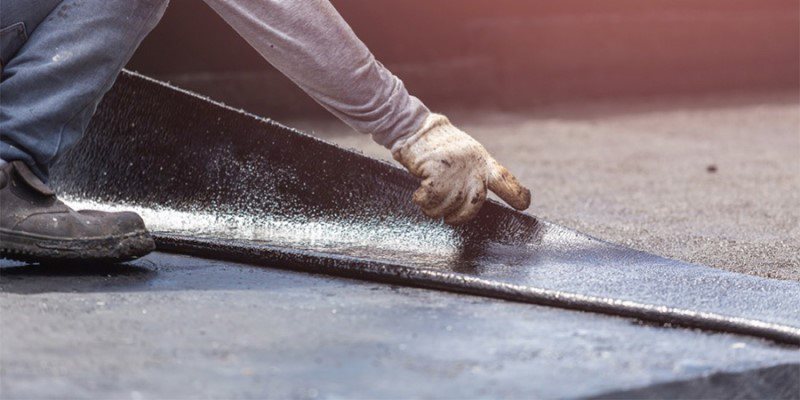
For garages and other larger garden or commercial buildings felt cannot be dry-fixed using nails and screws. Instead, the two methods which are most common are ‘torching on’ and applying with cold self-adhesive. Torch-on felt is generally seen as the quicker approach, but does require working with an open flame thus is more common among professional tradespeople. Using self-adhesive felt may be the slower of the two methods but is much more DIY friendly and is best suited for wooden decking. Both methods should be conducted when the weather is fair and dry.
How to Felt a Flat Roof with Self-Adhesive
- Prepare the Roof
When applying roof felt, the underlying deck should be constructed from moisture tolerant materials such as 18mm WBP plywood or suitable chipboard on a foundation of treated timber. The roof should be clean, dry and any nail heads should be flush with the deck rather than protruding. Any existing felt, excess fixings and adhesive should be removed completely.
Before laying any felt you should also consider the arrangement you will require when fitting roofing felt around edges and install edging timber as appropriate. For example, a triangular fillet for upstands and a wooden batten for gutter drips. Also consider whether or not you will need to remove the guttering. In the long run this may make the installation easier but can also cause problems if the guttering is difficult to reaffix.
- Lay the First Layer of Underlay Felt
The first layer of felt should be nailed to the wooden decking to prevent any rips or tears when the wood expands and contracts in changing temperatures. Start at the lowest edge of the roof and roll out the felt at right angles to the direction of the roofs fall. Align, measure and trim the felt to size as required by placing a cutting board underneath, scoring with a straight edge and cutting with a hooked Stanley knife.
After double checking that the felt is aligned and flat, fix to the deck using large headed galvanised clout nails at 150mm centres. This should be done around the edges of each sheet, leaving a gap of 50mm across one length and one width of the felt to allow for an overlap. As you work ensure that the felt remains completely flat, without any bumps or creases.
Continue this process for the following runs of felt overlapping each run with the one previous, fixing though the 50mm gap in the previous run whilst leaving a 50mm gap for the next. Once you reach your final run of felt be aware that this will likely need to be cut down to size.
- Lay the Second Layer of Underlay Felt
Once you have covered the entire roof, double check that there are no gaps, cuts, tears or holes were water could feasibly enter. Take special care when checking edges as these can be difficult to work around. Once you are satisfied you can begin fitting the second layer of felt.
Again, roll out the felt and align, measure and cut as needed. The joins of the second layer should not coincide with the first. This will add an additional element of defence and aid in keeping water out. When applying your adhesive make sure to consult the manufactures guide and cover an area slightly larger than the width of the felt being laid. When the required time has elapsed, as per the manufacture’s guidelines, lay your felt whilst making sure that no air is trapped and that the surface is flush and smooth. We recommend rolling out only one meter at a time to prevent any mistakes. Continue this process across the entire roof, again ensuring that the runs of felt are overlapped with each other by 50mm.
- Install Any Necessary Gutter Drips
A gutter drip is essentially a piece of top felt cut and fixed to a batten at the lowest sloped edge of the roof, so that water can drain off into the gutter without coming into contact with the wall. Ideally you should strive for ‘welted drip edges’ which can be made by cutting separate pieces of felt (typically 350mm in length), nailing them to a batten installed to the fascia at the edge of your roof with the underside facing out and then folding them back so that they are twice as thick with a final length of 175mm. Each drip should overlap the second layer of felt at the top by 150mm and align with the adjacent drips when nailed into the batten.
- Lay the Top Layer of Felt
Apply the top layer using the same method of bonding as the second underlay layer. The first strip should be lain at the bottom of the roofs fall, with the selvedge away from the edge of your roof.
Selvedge: the edge of the top sheet which is mineral free
Brush away any loose mineral chippings from the gutter drips and apply another layer of top sheet over the gutter drip pieces, letting the strip end 25mm from the edge of your roof whilst still overlapping the first strip. Remember to apply adhesive on overlapping strips. Continue to apply this final layer across the rest of your roof.
- Finishing Touches
With the final layer laid, address any additional edge details, remembering to use triangular fillets when dressing up felt to a vertical wall abutment. Finally, inspect the edges of your finished felt roof for any gaps in the seams and apply extra adhesive as necessary. You can also apply solar paint at this time which will reflect sunlight off the roof, preventing the felt from getting to hot. You should only paint the roof area and not the gutter drips.
How to Felt a Flat Roof Torch-On
- Prepare the Roof
Much like when applying felt using cold adhesive the first and most important task is to prep your roof. Make sure it is dry, clean, free of debris and that no nails are protruding from the deck. If laying on wood, you should ensure this wood is moisture resistant. Once this is done, you can measure your roof and order appropriate torch on roofing felt. As above, remember to plan for your edge details and apply edging timber as necessary.
- Apply Underlay Layer / Felt Primer
With your roof prepped, the next step is to either apply an underlay layer or primer. This will depend on the material of your roof deck, if it is timber or otherwise a material that is suitable for mechanical fixing you can apply an appropriate felt underlay material. This can be done as per step 2 above. However, if you are working with Asphalt or something similar a felt primer will need to be applied instead. This should be done evenly across the whole roof. Make sure you adhere to the relevant manufactures instructions whilst doing this.
- Apply Second Layer & Gutter Drips
Once again, this can be done is much the same way as a cold adhesive application. You should make sure that when you apply your second layer the joints do not overlap with the first (if you have used an underlay). As the application of this layer will involve working with a naked flame you should make sure to wear appropriate hand and feet protection.
After you have measured and cut your felt, roll it up and, starting at the lowest point of the roof roll the felt out whilst heating the underside bitumen of the felt evenly with your gas torch. This will allow the felt to adhere with a strong bond. Great care should be taken whist doing this to maintain an appropriate distance away from the flame. This can be done simply by holding the felt roll in place with an off-cut piece of batten whilst the gas torch is in use. Gradually continue to heat up and adhere the felt, ensuring that each run is overlapping with the one before it by at least 150mm.
Once this layer has been applied you can form your gutter drips by overlapping the last sheet of felt with the guttering to allow water to drain directly into the gutter without coming into contact with the roof deck or wall.
Note: When working with a gas torch, you should always have a fire extinguisher to hand in case of emergency
- Apply Top Layer
The top layer should be applied in the same way as the second, still making sure that the joints do not overlap. Depending on the size and design of your roof a cross bond pattern may be suitable, meaning that if the second layer was applied vertically you would apply the top layer horizontally.
When applying the first row of felt the same approach should be taken as for cold adhesive. The felt should be laid on the lowest edge of the roof with the selvedge away from the roof edge, loose mineral chippings should be brushed away and another felt strip should overlapped between the gutter drips and the first row of top layer.
- Finishing Touches
Any edge details should be completed after the top layer is fully secured. Verge edges (meaning vertical runs at the edge of a roof which are used to prevent rain driving over the edge) can be worked around by dressing the felt up a triangular fillet and over the verge into a batten fixed to the fascia. Once you are happy with your edge details, double check the whole roof for nicks and tears and apply more felt as necessary.
Whilst both the cold adhesive and torch on methods share a lot of similarities, always remember that no two applications are the same. Each roof, regardless of size or shape will have aspects that may make apply felt much more difficult that it may seem. If you are not 100% confident that you can apply your felt to ensure a watertight seal, we would always recommend consulting a professional.
How Much Does It Cost to Felt a Garage or Flat Roof?
This figure will fluctuate much more than a quote for a shed simply due to the additional detailing and labour costs that may be involved. That being said, based of an average cost of £50/m² a 20m² garage or flat roof could cost anywhere between £1000 - £2000 depending on the quality of the felt and number of days labour required.
How to Repair a Felt Roof?
Regardless of how well felt has been fitted to a roof, temperamental weather, unexpected debris and even just general and wear caused by time can lead to small tears or rips forming across its surface. If these are not patched quickly, they will soon develop into larger holes which could cause roof leaks and jeopardise the entire structural integrity of the roof. If it's your shed felt that's sprung a leak, check these quick fixes here.
How to Fix a Leak in a Felt Roof?
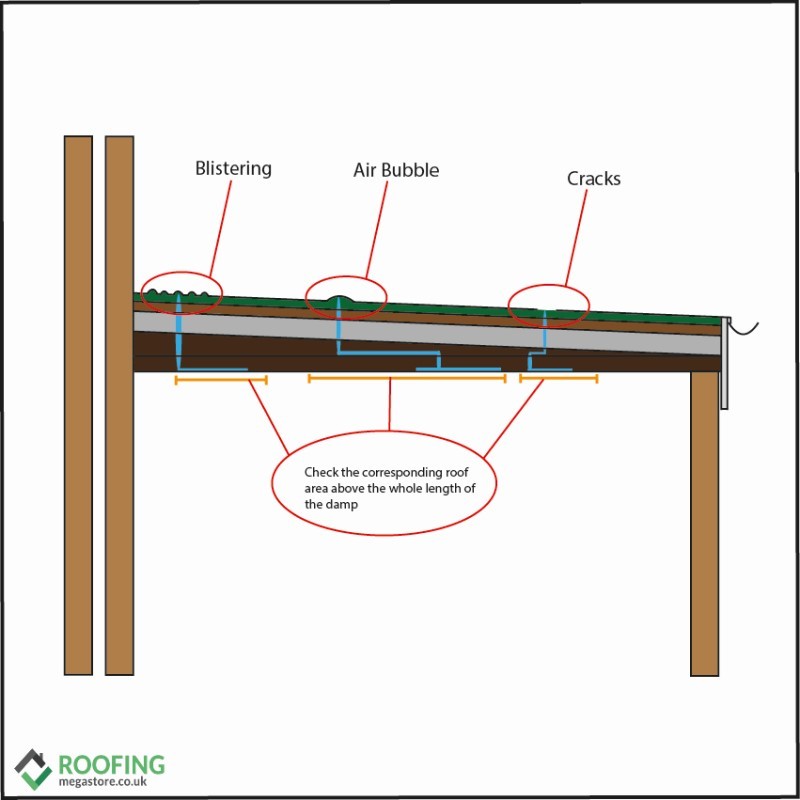
There are a few indicators you should be on the lookout for if you think your felt roof has sprung a leak. Damp across the inside of your roof is the most obvious but does not necessarily help you locate the source as water can run along your rafters. The best way to find your leak is by isolating the entire area of damp and carefully searching the corresponding area on the external side of the roof. You should be on the look out for small bubbles, blisters or cracks as any of these could be the root cause.
Once you have located the source of your leak repairing it is quite simple and can be done with only basic tools and a bit of bitumen. For blisters and bubbles, cut an ‘x’ shape through the blister and fold back the four resulting flaps. After letting the timber dry out (using a hot air gun if needed) liberally coat the area with bitumen adhesive and firmly press the flaps back together. Use a nail to hold them in place and then coat over the whole area with another coat of bitumen. If you have any spare roofing felt, this can also be patched over for additional security. Tears and rips can be sealed in much the same way – by simply covering with a suitable adhesive and patching over. Repairs like this can cost a little as the price of the bitumen, meaning as low as £5.
If you are repairing underlaid roofing felt on a pitched roof, this may be an appropriate time to upgrade to a breathable membrane, which have been in use since the 1980’s as replacements for felt. This can be a complicated job, best left to qualified roofers and can cost anywhere between and around £400 - £500.
How to Patch Repair A Felt Roof?
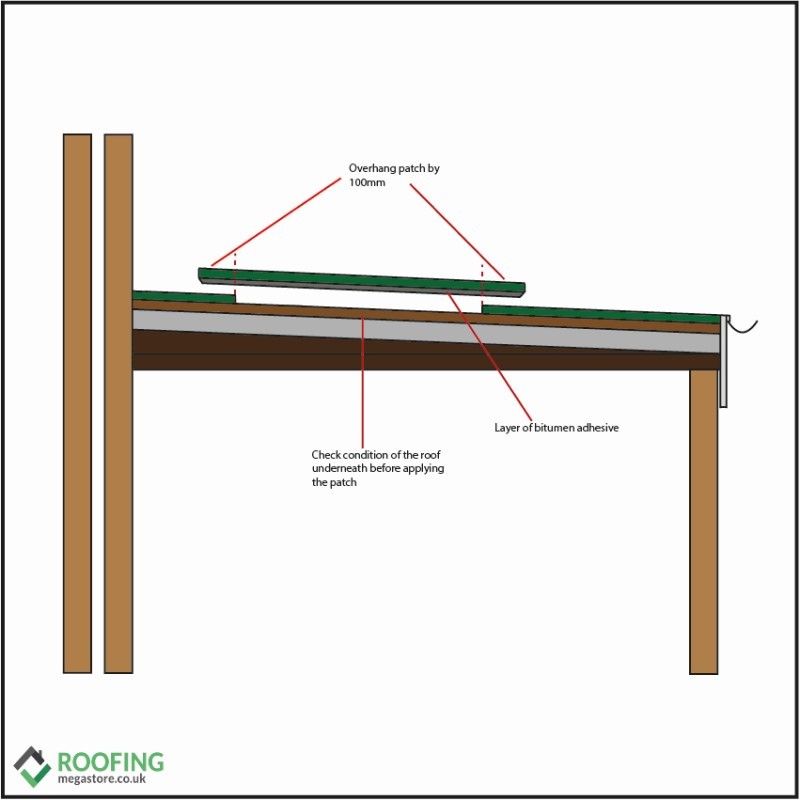
When you are patching over felt (either whilst repairing a leak or for covering a lager hole) the important thing to remember is to always check the underlying layers. Adhering a piece of felt is easy enough, however if the layers underneath are damaged, or even worse the timber, a patch job will only serve to hide the problem rather than solve it. Only when the root cause has been addressed should a patch be done.
When cutting felt for your patch make sure it is at least 100mm wider than the affected area. It should be generously coated with bitumen adhesive and applied firmly to avoid any bumps or creases. Further adhesive should also be applied across any and all seams. Sprinkling the patch with solar reflective chippings is also recommended as this will prevent it from absorbing to much heat during the day.
How to Repair a Felt Roof from the Inside?
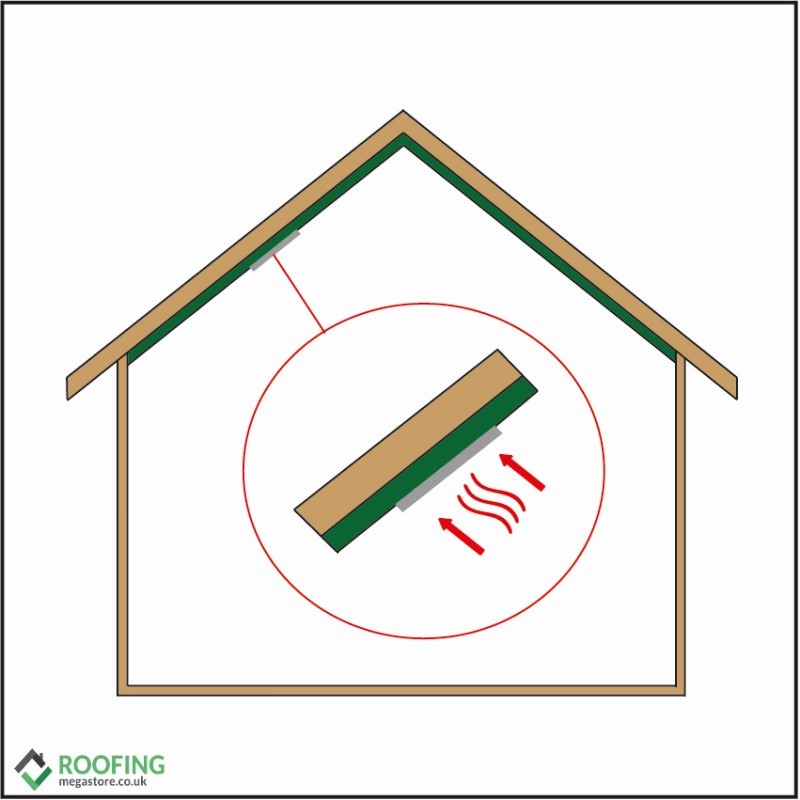
If roofing felt has been used as an underlay in your roof, there is a chance that it may tear over time. Fortunately, in most cases these can be repaired without too much hassle with some simple flash banding. Once it has been cut to a suitable size, peel off the backing tape and adhere the banding to the damaged area. To ensure the banding is long lasting and bubble free, you should then use a roller to iron out any creases whilst also heating it with a heat gun. This will allow for even stronger bond between the flashing banding and felt. Be sure before you perform this repair that the felt is neither cold nor wet as that may hamper the bandings adhesion.
How to Repair Rotted Roof Felt?
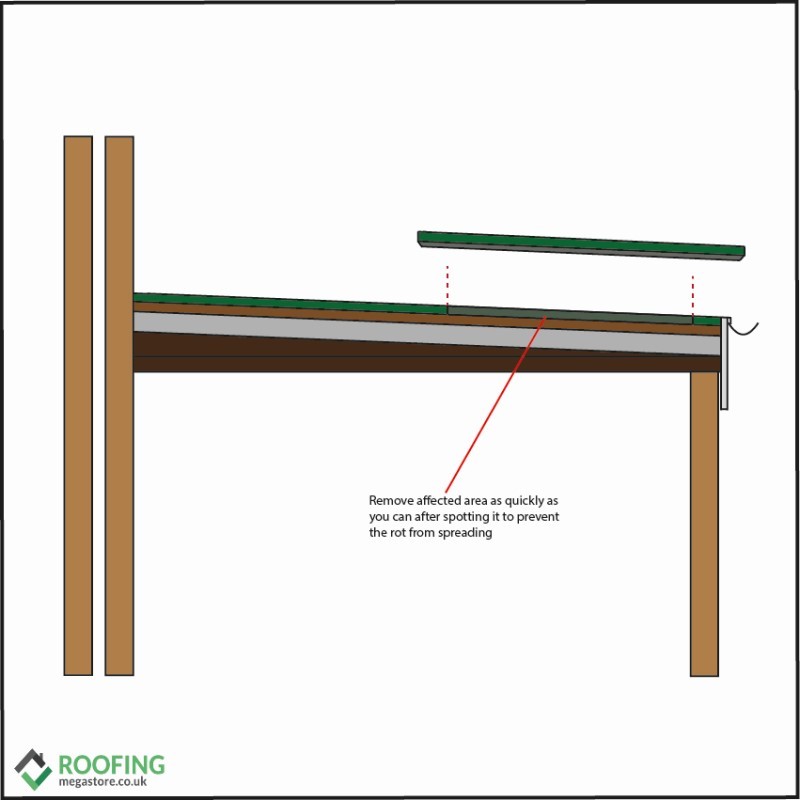
If you felt has begun to rot, repairing can be as simple as cutting away the affiliated area and replacing with more felt as you would with any patch job. However, if the afflicted area is large you should consider replacing the whole roof. Especially as, this issue may have resulted in damage to the decking or timer of your roof.
Ordering the Right Roof Felt
Arguably the most important part of any job involving roofing felt occurs before any installation or repair. Whilst every project will be different, the one thing they all have in common is the need to source the best and most appropriate felt possible.
Here at Roofing Megastore we have a great range of roofing felt for you to choose from which can be delivered direct to your door. Simply order online, talk to us via our online chat or get in touch directly at 01295 565 565. Our award-winning customer service team will be happy to help with any questions you may have.