How to Fit a VELUX Roof Window

The VELUX roof window is a stylish, practical, and convenient choice for virtually any property type. They boast a very user-friendly design that makes them easy to install DIY without the need to hire a professional fitter. Installing a window by yourself may seem like a daunting task, especially if you have no previous experience in this sort of installation. However, with our handy step-by-step guide, you can achieve a high-quality fit for your brand-new VELUX window minus the stress.
What Will I Need?
To install a VELUX roof window, you will need:
- Installation guide provided in the box
- Carpenter’s square
- Tape measure
- Spirit level
- Utility knife
- Screwdriver
- Screws
- Crowbar
- Angle grinder
- Drill
- Pencil
- Safety equipment including gloves and goggles
Health & Safety
To ensure your new roof window is installed in the safest way possible, make sure to follow these health & safety tips:
- Utilise safety gear such as safety gloves and goggles, especially when working with dangerous or messy tools. Some of the equipment used can be sharp, so protect closely exposed skin to avoid injury.
- Call a friend if you need further support. If you are struggling with installation on your own, always ask for additional help to avoid injuring yourself.
- Keep the working area clear to minimise the risk of tripping or falling.
- Take appropriate care when working around the gap in the roof space. Make sure children keep clear of the area, especially when the window opening is exposed.
How to Fit a VELUX Window
1. Preparation & Unboxing
Before you can install your new VELUX roof window, you first need to prep the area and remove your window from its packaging. The last thing you want before or during installation is to damage your new window, so ensuring that the space you are working in is accessible and clear will help to prevent any unnecessary accidents.
Once the area is unobstructed, you can move on to the unboxing. Place the box on a flat, stable surface whilst removing the packaging. To create a stable base to work from, press the tabs in and pull the box outwards.
Remove the window, hood, installation guide and box including brackets and parts.
Within the contents of the box, you will find an installation guide. This guide will vary depending on the type of flashing that you have for the window:
- EDW Flashing Kit – follow red colour coded guide
- EDL Flashing Kit – follow blue colour coded guide
2. Removing the Sash
Position the window in an upright position, removing the polystyrene sections on the top of it. If the window is centre pivot, carefully open the window and remove the blocks of polystyrene from the control bar, then place them on top of the window sash. Rotate the window sash until the blocks are on the floor, then remove the sash from the frame using the button on the hinges. Keep the sash stored in a safe place until further steps.
3. Creating the Opening
Using a carpenter’s square and pencil, carefully mark out the area for the window opening. The width of this opening should be 40-60mm wider than the actual VELUX size. Work from the middle, going outwards and removing the battens or roof felt until you can see the roofing tiles. Once the tiles are visible, start carefully removing them one by one.
4. Installing the Battens
Now, install the lower installation batten, fitting so the top edge is 80mm higher than the first row of tiles below the window. You can check the batten is completely level using a spirit level.
Using a tape measure, carefully measure upwards from the top edge of the lower installation batten. After adding 45mm to this measurement, mark the measurement placement using a pencil. This is where the upper installation batten will be fitted. The upper batten should be overlapping the opening width by 100mm, whilst the lower batten should be overlapping by 250mm.
Before fitting the frame, trim back excess felt and remove the row of tiles below the opening you have made.
5. Fitting the Frame

Next, it is time to install the window frame. Begin fitting the installation collar, and clip the corners of the collar together. Place in the opening space you have made.
You will now need to refer to the installation manual that was provided with your VELUX window. Paying attention to the instructions, attach the brackets to the window.
Position the brackets over the pre-drilled pilot holes and screw them into place. Then, place the window frame over the roof opening and begin fixing it using screws and a screwdriver. Using 30mm and 80mm screws, fix the bottom brackets to the lower batten, ensuring the screws go through both the batten and counter batten. It is also recommended that you secure the screws into a rafter if this is possible.
Move on to the top brackets and screw in 30mm screws. However, do not screw in the whole way, leave about 10mm out so they do not feel completely screwed in.
6. Securing the Window
Place the sash back in the window frame, lining up the curved hinge of the sash with the frame slots. The gap between the sides of the sash and the frame should be completely even. If you do find that the gap is slightly uneven, you can use a crowbar to carefully pull the edge of the frame until the gap is even.
Now, open the window to double-check that the gap in between the sash and the frame is even. You may find to make this gap even, you need to place the black wedge (included in the flashing kit) in the upper bracket opposite the wider side.
Next, it is time to remove the sash once again. Once removed, screw in the 10mm of the upper 30mm screws that you left slightly loose previously. Add 80mm screws to the upper brackets, entering the brackets and a rafter.
Use a pencil to mark the positioning of the transverse gutter’s position. Ensure this is placed at an angle to allow for water runoff. You may remove a section of the counter batten in order to attach the gutter to the rafter.
Next, cut a flap in the felt, add sealant, and then position the underfelt collar around the frame. Remove the protective strips on the collar and stick to the edges of the window frame, carefully securing the corner flaps. Staple around the battens, making cuts where necessary to fit around the counter battens.
Fix the gutter, folding the underfelt collar into it. Cut away any extra material using a utility knife, then use the clips provided in the kit to secure the flap.
7. Fitting the Flashing
Profiled tiles should be chamfered so that the highest point is 130mm under the bottom of the window. Position the bottom part of the apron flashing, pushing and shaping it over the tiles. Before fixing, bend the pleated section back 45 degrees then place it back into position to ensure it is fitted snugly and securely. Once repositioned, screw into the side of the frame.
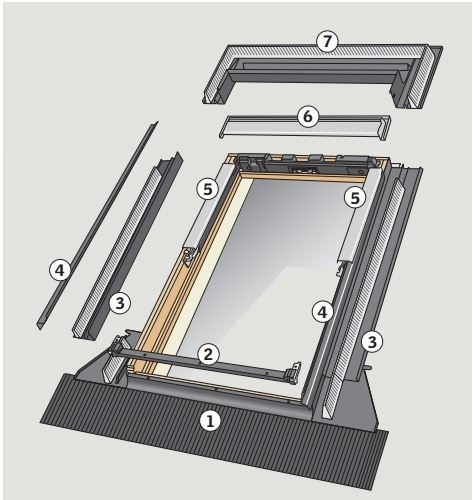
You can fit the side flashing by sliding them into place and then using tabs to attach them. Secure in position by folding the tabs over and fixing a nail. Before moving on to the next step, ensure you have removed the part 5 flashing parts (see attached diagram).
To fit the side frame covers, click them securely into place and slide the part 5 flashing parts back into their original placement. Ensure you hear the click before moving on. Screw the hood section into place, then position the top section of the flashing. You can use the tabs to fix it by holding them down on each side of the window.
8. Tiling & Vapour Barrier
The final step of the installation is to finish tiling around the window and fit the vapour barrier. Using a utility knife, cut the foam gasket on the side and top. Make sure you leave a 60-150mm space between the top of the window and the tiles to allow for water drainage. If you need to cut tiles to fit, use an angle grinder.
Secure the vapour barrier into the window’s internal lining rebate using the specialist tool provided in the window kit. Use screws in every corner to fix, then use tape to attach to the vapour barrier already in place. This will minimise the amount of water that can enter the roof.
Finished!
And you're done! You have successfully installed your very own VELUX window. Your space is transformed with huge amounts of natural light and practical window functionality.
If this post has inspired you to fit a VELUX roof window in your home, have a read through our VELUX window prices to take a look through the high-quality range available on Roofing Megastore now. We stock a multitude of styles, sizes, finishes and operation types with blinds and flashings to match. If you already have a VELUX blind in your home then be sure to read our how to install VELUX blinds guide.
For any other questions or queries, don’t hesitate to get in touch with our helpful customer service team who will be more than happy to help. Simply give them a call on 01295 565565, email [email protected], or use the handy live chat below.